"If they aren't valuing science they are valuing ignorance"- Neil Degrasse Tyson
Launching day:
|
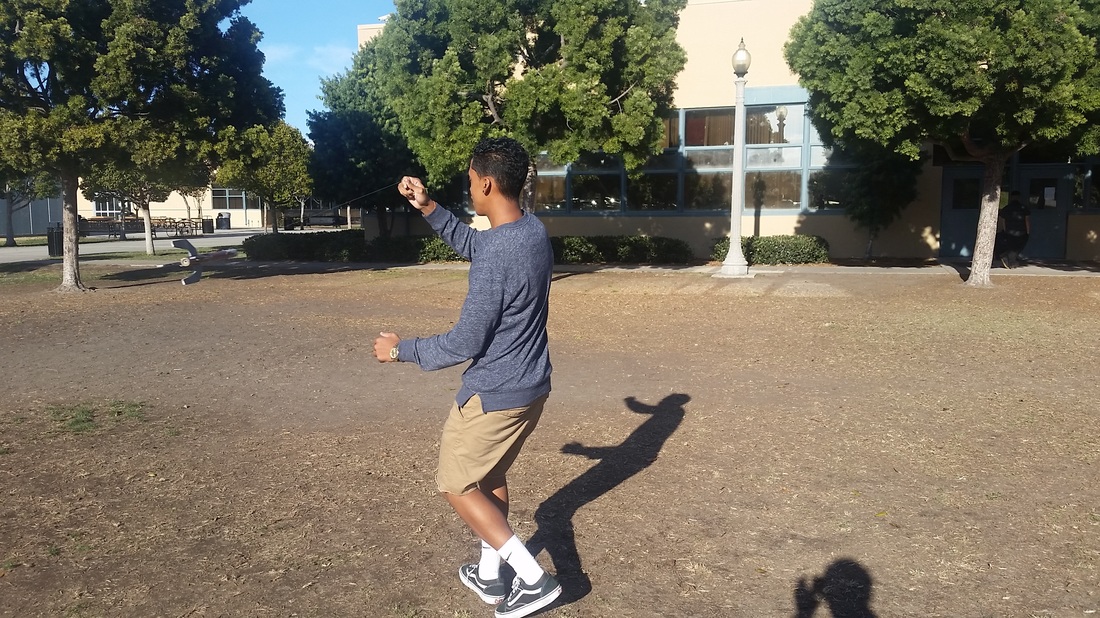
We went to launch our rocket at Fiesta Island. We strapped a altimeter to see how high the rocket will go,It went 219 ft.
|
|
Fourth day: Rocket testing
|
Today we glued our fins to our rocket body while our other teammate made the quail egg. Once we were done gluing our fins we attached the quail egg chamber and but the nose cone on. We spray painted the egg chamber and wanted to but a decal but i don't think it will work, the egg chamber and the decal. Once that was done we had to test if the center of mass was good so we tied the rocket to to the string and but the fake motor which would have the same weight as our real motor. We went outside to test it by spinning in a circular motion if it stayed straight it was fine, if it were to wobble its a thumbs down. Lucky our was good and stable and we have accomplished more today.
|
|
Third day: Rocket progression
|
So the third day we wanted to add make our rocket look cool other than being plain and basic so my partner and I went to got look for spray paint. We borrowed the paint from and art teach at our school, but we had to look around my school for all the school for materials like a mask, tarp, gloves, and a box. It took us at least 15 min to find all of this which took up some valuable time. In the end i was glad we made our rocket look more snazzy. We painted to red, blue and grey it turned out pretty well.
|
|
Second day:Rocket progression
For the second day we made the fins. We dug around the box of bosselwood to make fins good and thick. What we measure our our wings and made cut outs for the shapes so we can make them. We cut them out with a razor blade it was a struggle. Out rocket fins look hacked and slashed till we sanded them down to make them even.
First step making the rocket:
First thing we did we has make body. So we gathered the rolling paper and and the PVC pipe to make it. We made it by cutting thin slices of paper and spiraling it around the pipe. We layered with wood glue because we ran out of the other solution to hold it together. We waited a day after but we ended up having to do it again because it we didn't roll that well. The next one we did we had our teacher help which was really appreciated. Had had it rolled nicely and let it dry till the next day.
Planning for our rocket group ideas:
|
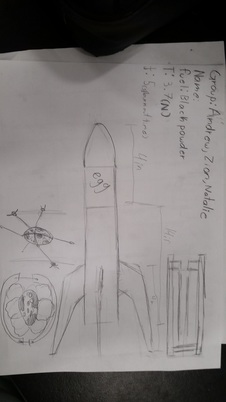
The first thing we did when planning was firing off ideas then started to sketch our picture. Our teacher gave us an idea of putting a quall egg in our rocket for extra points. So one of my partners had a cage idea to but the egg in. I thought it wouldn't work i was more confused about her idea as we were sketching we decided that she do her thing and me and my other partner do another. Our fin design we look at previous rocket that were done and sketched it but made it our own. A lot of ideas were thrown out there all great but were they were not realistic enough with the resources that we have.
|
|
rocket motor testing:
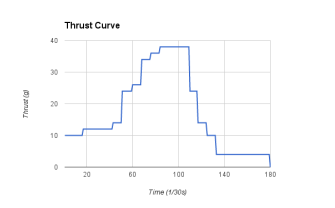
Along with making the rocket motor. We had tested them to see their thrust. It was amazing seeing how much much pressure the other motors had. My groups motor didn't do so well. It was super slow. It wouldn't even have enough power to lift off the ground.
Making Rocks:
materials:
|
Purpose:
The purpose of this experiment was to learn more about Earth science. To also learn about silicate, how it works and where is it found.
Earth information:
We had gotten a refresh on the earth's core and levels of the earth. We talked about the magnetic field and how Mars use to to have one but it was striped by the solar waves, Also we learned about silicate and how it mixes with metal. With mixing it with metal, elements that are further react first. We were also told that the periodic table does not need to be memorized you just need to know how to read it.
Core- solid iron and nickle
Outer core- Liquid iron and nickle
Mantle- Molten rock (silicates)
Crust- outer solid mantel
95% of Earths crust is 97% made out of silicates.Making the rocks there was a combination of silicon and oxygen.
Core- solid iron and nickle
Outer core- Liquid iron and nickle
Mantle- Molten rock (silicates)
Crust- outer solid mantel
95% of Earths crust is 97% made out of silicates.Making the rocks there was a combination of silicon and oxygen.
what happened:
This was so fascinating to me because it how the colors were changing form. They looked like veins kind of.
Results:
The first test tube it look like a spider web kind of. Same with the second. It was different with the second test tube it started of as a red blotches then pink and blue started to grow this is the one that looked like a vein to me, but I wonder what it would look like in a bigger container. The third test tube nothing happened, it was boring I tried to look closely but still nothing was going on.
The first test tube it look like a spider web kind of. Same with the second. It was different with the second test tube it started of as a red blotches then pink and blue started to grow this is the one that looked like a vein to me, but I wonder what it would look like in a bigger container. The third test tube nothing happened, it was boring I tried to look closely but still nothing was going on.
Looking forward:
Looking forward I would like to do this experiment again but in a bigger container. To see how big it can actually grow and compare the first two and to see what was really happening with the third one.
Making H2O with combustion:
materials:
- magnesium
- beaker
- citric acid
What happened:
In this lab we made H2O and put it into the balloon. First we added citric acid and water into a beaker, we mixed it so the two mixed to get a chemical reaction. After that we added a few strips of magnesium and pulled a balloon over the top of the beaker. Doing that making H20 the helium from mixing the magnesium would make the balloon rise. When we tied it off and we were done playing with the balloons. We had gotten to light my balloon with a candle, taped to the end of a broom stick we held the balloon over the fire and watched it burst in to a ball of flames with a loud boom following it.
looking forward:
Looking forward I think l like I would prefer to work with my teacher for guided projects. My group had fun with the balloon but it slipped out of our each when we accidentally let it go. I think my group we communicated well and walk away with more knowledge we came with.
Molecular level/Elements my notes etc. :
7 Atoms = 7 Energy Levels
8 Columns = Electrons in each level (except for energy level 1)
Atom levels:
every atom will react with another atom to achieve a full shell of electrons.
8 Columns = Electrons in each level (except for energy level 1)
Atom levels:
- Nucleus
- Energy Levels
- Electrons
every atom will react with another atom to achieve a full shell of electrons.
Making rocket motor mixture:
what happened:
This past week I have teamed up with a few class mates which will be my partners for the remainder of this semester. The project is to build our own rocket motors with a black powder base fuel or a sugar fuel. At the end of making all the motor we would walk down to NTC park. My group was originally just me and Andrew but we found a few more partners wanting to do something similar to us. Soon we were in class researching the difference between a core burner and a end burner. We had to make a sketch and make measurements for the compositions we want to be in our motors. Our motor didn't turn out so well it was very slow and it wouldn't get that much lift. what had happen was we did an hybrid kind of we had the core only drilled to the middle but what we needed was it for it to just be a core burner.
Looking forward:
Looking forward I would change my choice in partners. We just didn't really work well. All try to be the dominate one to get our voice heard. Another thing is I would do different sketches and have more options. Maybe give the teacher two references and see and ask him which one would work better.
Moon Sand/Kinetic Puddy:
materials:
- Baking soda
- Baking powder
- Dishwasher soap
- A bowl
|
I worked with Isabel on this experiment Madison joined in helping us a lot. Originally our plan was to make Moon Sand with cornstarch, sand and water. We didn't have any cornstarch but we did have which was the wrong thing to use although we were told it would work. When we added the liquid cornstarch the water and sand together it ended up being muddy, not how we planed. After a failed experiment the first time we look use how else to make it.
First we mixed all these ingredients together (under materials). We poured half a cup of the baking soda and powder and then a full cup of dishwasher soap. We mixed it and it ended up having to much dishwasher soap. Even though it smelt good it was way to much. We adding more of the powered or more of the dishwasher soap. The dishwasher soaped helped it stick all together making it form like a play dough type. As we were trying to make moon sand and not play dough, we added more powder it started getting that affect. After we were done making it with the right ingredients we played with our "moon sand". |
|
What happened on a molecular level:
Moon Sand is a sand coated with hydrophobic compounds. The presence of this hydrophobic compound causes the grains of sand to stick fast to one another and form cylinders when exposed to water. These properties are achieved with ordinary beach sand, which contains tiny particles of pure silica, and exposing it to vapors of trimethylsilanol (CH3)3SiOH an organosilicon compound. Upon exposure, the trimethylsilane compound bonds to the silica particles while forming water. The exteriors of the sand grains are thus coated with hydrophobic groups.
Looking forward:
I enjoyed this experiment and seeing how things will work out if we did things wrong. We had to do our best to figure out what would be the appropriate amount for each ingredients. Looking forward I would not want to do this again just because of how messy I had gotten.
Looking back:
Something I would of done differently was plan a little better with the weather and time. It was raining Monday so we couldn't get any sand. We wasted a lot of time trying to work on the first experiment because due to the loss of cornstarch we had to improvise. It took us the third day to start to make the second plan with the soap. Another thing is I wished we had taken a picture of the first moon sand to compare to the new one we had made, it was a big difference.
Flame test lab 10/13/15:
Information given to us:
|
|
What happened:
Today in class was super fun. I had run out of things to do for this section so I decided to do the fire experiment. I was excited because we were playing with which I really like to do. I find it fascinating and seeing fire change color that was great! I was curious on what else you can use it for or like want events? At first our teacher explained the safety precautions and what we would need. One by one he asked for volunteers for who would like to burn the element on the burner.My favorite one is magnesium because of how bright it shined. It looked like a star that you see in the sky, it was amazing. I really enjoyed the experiment and I would like to try it again someday.
What do I prefer?
For me, I prefer to work independently. Although I enjoyed working with the big group and have the project more guided I would like to have more control and interact with what I'm doing more.
Moving forward:
I would definitely work with a group again. Not for my main project but just to put some points on my grade. Last week I did well because I was more guided with my work. But I really like the project our teach has set up for us. I can't wait to see what is in store.
9/21/2015-9/29/15 Rocket Science:
Materials:
- Everything that came in the packet
Previous thoughts:
|
My thoughts when our teacher told us that we were building rockets got me super hyped! I had build water bottle rockets in 8th grade but now we had gotten to make it with real motors! I was thinking, "man this is going to be ha thinking we had to make it from scratch. Just then my teacher said he had model rockets for people who don't know how to build an actual rocket. I was glad to be building it knowing we get to launch it, once again I partnered with my friend Andrew to work with through out the process.
|
Through out the days:
The first day Andrew and I had to know all the parts of the rocket before we could build it, Our teacher gave us links to help us study the parts. Here are the two links that we used to help us link1, and link2. After studying our teacher gave us a quiz asking what things were on the rocket. We passed and started to work on the packet.
Further progression/ looking forward on lava lamp :
Further progression:We had a chance to try and make a new lava solution with new things because most didn't turn out the way they were suppose to. Ours came out fairly close, we had mix coconut oil with some alcohol and mineral oil. We kept on getting this foggy type of substance in the middle. With a number of tries we had gotten the right measurements but it was still a little bit cloudy. The beaker was so small you could heat the lava up with your hand.
Looking forward:This project taught me patience in measurements and trying to find the right solutions. Also with working in a group where you think that person is kinda annoying and you have to put up with it because it's just part of life. The project was interesting overall I hope i get to make a lava lamp again some day.
|
|
9/9/15-9/14/15 Lava lamp lab/Progress:
9/14/15 Overview of day:
|
My group and I started to make support to hold the beaker. We then drilled 5 holes into the base and put flat head thumb tacks in the holes. Next we taped the base with a aluminum tape so the tacks would stay in place. We also glued the light panel to the so we waited till the next day to make the inside of the lava lamp with benzyl alcohol and salt/fresh water.
|
|
9/11/15 Overview of day:
|
My group was able to make the bulb work, the only problem was that the battery couldn't power the light to its fullest. Therefore we had to figure out how to get the light to operate to the fullest. We went to ask Andrew and he told us that we should get a old phone charger that can be plugged into the wall that pushes 2.4 volts which is what was needed. We went to Scott Swaaley's a teacher to ask if he had something like that, he gave us a charger that had numbers where we can control how much volts we put into the light. Another problem was how were we going to attach bulb to platform? We solved it by cutting one of the wires and soldering the wire to the platform. Now that we had our light/heat source we could work on the lamp it's self.
|
|
9/10/15 Overview of day:
|
My group and I took a flashlight and took off the bulb and the panel that powered the light bulb. We cut it down to fit our base and we soldered a wire on to the negative. It was really interesting to see how to solder, Andrew taught me and let me solder. The next day we connected the wire to a battery to see if it turns on to see if it's hot enough.
|
|
9/9/15 Overview of day:
|
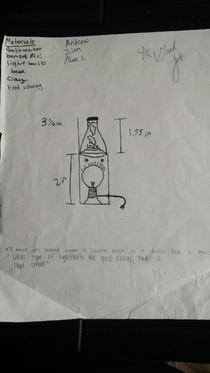
In class my group Andrew and Alex, for our project we made a 10mm beaker lava lamp which is really challenging. We had made a sketch of what our lava lamp was going to look like. We took precise measurements using measuring tape.
|
|
9/8/2015 Second Lab: Dry Ice
Lab rules dealing with Dry Ice:
- Dry Ice can still harm you if you remain contact with it for too long.
- In order to prevent from being ice burned, we should toss the ice like "hot potato" in our hands when wanting to hold it or move it to places.
Materials:
- Each table was given two chunks of dry ice.
- Each table was told to get a medium flask or a beaker of water
- We were also supplied with one balloon (optional) for the experiment.
Hypothesis:
I thought it was going to be fun. I have dealt with dry ice before, but for fun. I thought doing this experiment it was going to be very stricted. I knew it had to do something with gas and vapor. I was super excited to do this experiment.
What happened?
|
My group and I had so much fun during this experiment. Lots of activity going on. So at first we were given a chunk of dry ice, a medium beaker full of water, and a balloon for an optional experiment. We put a few pieces of dry ice into the beaker. It made like this water vapor cloud which was very cool. after a while we decide to do the balloon. So we put the dry ice into the balloon and began to shake it. It expanded an had gotten larger. Of course knowing my group we played "Don't let the balloon hit the ground. It was fun in the moment, I got to bond with people I normally wouldn't.
Looking forward?I can definitely see my self working on further projects with people from my group. Me and a classmate from the group have already decided to try to make "Moon Sand".
|
|
9/1/2015 First Lab: Ooblek
Materials:
- Bowl of corn starch.
- Small flask/beaker of water
- With our table mates, we were to mix the water with the corn starch to see what time of form of mass it categorized as.
- We were to document every step and were encouraged to play with the Oobleck to discover the science or reasoning behind it's form.
Hypothesis:
I had did a project like this in elementary but my memory of it is very faint. I figured since it was water and cornstarch it would make a doughy kind of substance. I thought the more water we put the cornstarch would just dissolve.
What happened in the experiment?
Something so simple could be so interesting. In this lab when we poured a little water out beaker into the cornstarch, My group mixed it around with our fingers because its a harmless substance. We kept all of it in the bowl at the time poking it and shifting it around. Then we decided to pour more water out the beaker into the Ooblek, then on to the table we had poured it after a while ans started to make hand prints and tried to write our names with it. It was exciting and fun but messy. After a while of messing with it on the table my group decided to try and pick it up and make it into a ball. Questions started to arouse in my mind, How will it stay together if it acts like a liquid even if we hold it? Well we found that if you keep tossing it back and forth between your hands the Ooblek tends to keep its form as a solid. We played catch with the Ooblek and when it landed on the table it land with a big SPLAT!! It just expanded once it hit the table. The only part I disliked about this lab was how messy it was, I hand Ooblek on my cloths all over my hands and under my nails. This substance was so interesting, when I'd smack it you would think it would splatter but it didn't. It was still and stiff. When I would leave my hand on top of it and apply pressure my hand began to sink in to it. This project was fun, interesting, and super amazing.
What did I learn/find during this project?
- I learned/found that Oobleck acts like various substances . It varied between being a solid and a liquid.
- The corn starch is the reason for it acting like a solid.
- I found that when more pressure is put on the Oobleck, it is in its solid form. At less pressure is put, it is in its almost liquid.
- It was as if the Oobleck had acts on what ever you put it in and takes its shape.
- I think slick movement is what makes Oobleck change from liquid. When the Oobleck is still and not touched, it stays a liquid.
- If you put a solid between Oobleck and another solid, it becomes solid as well as the form is being copied.
- Oobleck responds differently to impact.
What if the form of mass, solid or liquid?
I feel that it can go both ways. But if I were to chose one it would have to be a liquid because if you put it in to a bowl it takes a circle shape, same with a liquid. If it were to be a solid it would be stiff and not very likely to have movement. It wouldn't be a solid unless you'd add more cornstarch than what there already is.
Molecular level explanation:
So whats happening in the molecular level is the atoms have enough space to slide past each other. If Oobleck were to be a solid it wouldn't be able to drip and drizzle through the cracks between your fingers.
